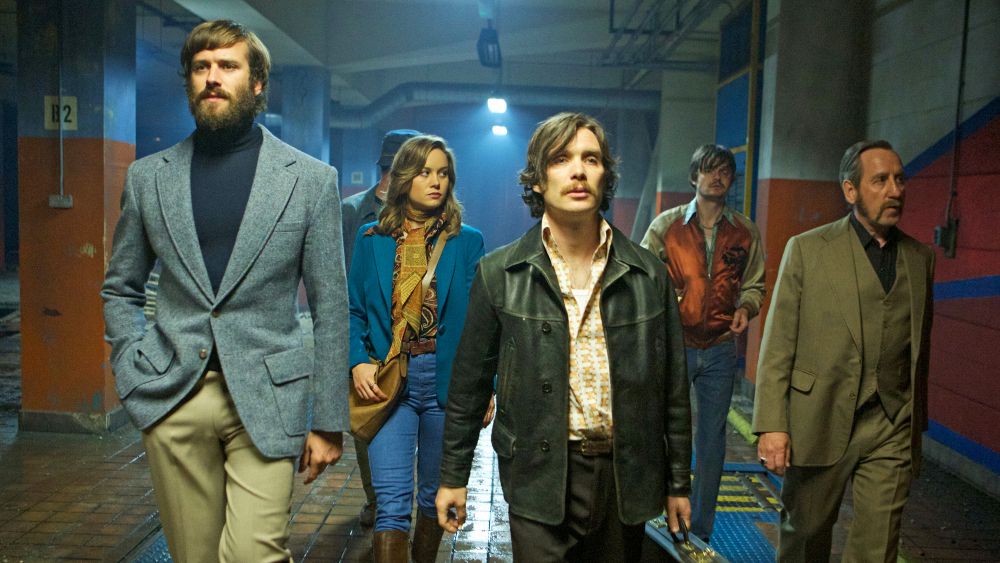

The start of this week saw the release of the film Free Fire on Blu-Ray and DVD in the UK. Set in the 1970’s, it’s an incredibly tense film all set in one location as an arms deal goes incredibly wrong. The film is packed full of twists and turns and well worth a watch. Incidentally, it was also filmed just round the corner from where I used to get my car serviced when I was in Brighton.
When I first saw the film, I started writing a wargames scenario (scribbling down ideas on the way back from the cinema) but then that whole “lets write a book” happened and it fell by the way side. But seeing as the film has just come out for everyone to watch it, I thought it would be a good time to finish it off.
The scenario is going to spoil a few things from the film so go watch it before coming back. Everyone past the double horizontal lines should be considered spoilers.
Seriously, don’t read further unless you don’t mind being spoiled on a really good film.
This scenario should be considered Alpha – it hasn’t been tested and will probably need one or two tweaks before I’d put it into prime time. Due to the setup, it’s also quite special rules heavy (although not as heavy as it could have been). In the case of anything not working, I recommend players feel free to tweak the scenario to their heart’s content before playing. I would love to hear the tweaks people come up with. Also this will be in a slightly different tone to many of the usual scenarios I show off. It’s a little bit of fun inspired by a film I like.
I’m going to run through a generic version of the scenario on the blog, covering the sides, layout, victory conditions and special rules. This version is designed so anyone can look at it and make it match their chosen set of rules. However, there are two PDFs available giving the exact details for Skirmish Sangin and Spectre Operations.
If you want the scenario for Skirmish Sangin, Click Here.
If you want the scenario for Spectre Operations, Click Here.
Two parties meet to sell each other some guns. The deal is almost done, despite some issues along the way, when something goes horribly wrong. It begins with an argument but escalates when someone gets shot. Now we have a gun battle. Worse, a third-party is already on site and about to join the show
Forces:
The Buyers:
The Leader (1): Trained with Pistol **
The Bodyguard (2): Trained with Pistol *
The Cousin (3): Novice with Pistol *
The Help (4): Novice with Pistol
The Contact (5): Trained with Pistol **
The Full Back: Trained with Pistol
The Sellers:
The Prodigy (6): Novice with Pistol *
The Right Hand Man (7): Trained with Pistol *
The Operator (8): Trained with Pistol **
The Loudmouth (9): Novice with Pistol *
The Realist (10): Novice with Pistol
The Third Party:
Gunman, Enter Stage Left: Trained with Battle Rifle
Gunman, Enter Stage Right: Novice with Carbine
The Third Party will also take control of two other characters during the scenario (see the special rules)
Map Layout:

The number on each the circles link back to the list of characters further up the page.
To represent the small-scale of this gun battle, I recommend playing on small board (2’x 2′ or less). I’ve shown some areas of cover but it needs to be densely packed with plenty of half height and full height cover spread throughout the warehouse floor.
Starting positions
The map above show all the starting positions for those characters that begin on the board.
The two gunmen enter the board using the positions marked. They can choose which elevation they start (ground floor or first floor).
The Full Back moves on using the door marked on the plans.
Victory Conditions:
All three parties have the same goals. The game ideally ends when only one team is left. However, if you need to work out the winner when you run out of time, here are the victory points
- The Money: This is a moveable objective any character can pickup and move. To be in control of it, the team must have . It’s worth 200 points
- The Guns and Ammo: These are stationary objectives shown on the map. To be in control of each one, the team must be the only figures within 3″ of it as the game ends. The guns are worth 150 victory points, the ammo is worth 100 points
- Last Team Standing: If only one team is left standing, that team automatically wins.
Special Rules:
It Kicks Off: As the game starts, the action is just kicking off. As such, the characters are desperate to get behind some hard cover. In the first turn of the game, no character can shoot – they are too busy rushing for cover/to grab a gun/to get the money.
Delayed Reinforcements: The Full Back is on his way to assist with moving the guns after the deal is over. As such, he’ll be joining the party a little later than everyone else. The Full Back arrives on the board part way into the game (the exact time has a chance to vary and appears from the doorway marked on the map.
Who are these guys?: To begin with, the Third Party starts with no one on the battlefield. The Third Party player can, at any point in the game, choose to deploy the two gunmen. They appear from the positions on the map.
Not what they seem: One character from each side is not who they appear to be. At any point during the game, the Third Party player can take control of the Contact and the Right Hand Man. I recommend not telling the other two players that this may happen – instead they should take advantage of the surprise. Note, The Contact and the Right Hand Man will not shoot at each other. If one is about to engage the other, the Third Party player has to taken control of the one about to shoot.
Arming Up: The assault rifles, the whole purpose of this meeting, are currently sitting in their boxes. If a figure moves into contact with one, they can pick up an assault rifle and start using it.
Additionally, once the two gunmen have been taken out of action, the weapons they are using can be picked up by any of the other figures on the board
Limited Ammo: Although the new assault rifles are freely accessible, they only have a limited amount of ammo with each of them. Every time one of the collected assault rifle is fired, roll a D6.
- On a roll of 6, the rifle goes click. No shot takes places and the figure can no longer use the assault rifle.
- On a roll of 1 or 2, the burst finishes and then goes click. Resolve the shooting as usual. However, the assault rifle is no longer useable until the figure has picked up more ammo
The Van: Good news, there is more ammo for the assault rifles. Bad news, it’s all in the van. As the game begins the van is locked and inaccessible. To unlock it, someone has to grab the keys that are in the middle of the arena and then bring them into contact with the van. The Limited Ammo rule for a character can then be removed by moving an assault rifle wielding figure into contact with the van.
(Optional) Luck of the Devil: It’s amazing how around some people even a point-blank shot can miss. Some of the characters above have a number of asterisks after their names. This represents how many luck tokens they have to use over the course of the game. Luck tokens can burnt anytime a character is hit. Burning a token ignores the physical effect of that shot (they still take morale or suppression damage from it).
Now you’ve read through it, here are the links to get the version specifically designed for the two main games I play. I look forward to hearing what happens when you play. Enjoy!
If you want the scenario for Skirmish Sangin, Click Here.
If you want the scenario for Spectre Operations, Click Here.